Workflow Tasks can be sent to Microsoft Outlook with the Outlook Add-In. It displays the Tasks directly in Outlook so you do not have to click the received link to navigate to the Process Portal. What's more, you do not have to log in to the FireStart Client because you can start a Workflow directly over the Add-In.
Installation of the Outlook Add-In
There are two installation files for the Outlook Add-In. In the following, you learn how to install the Outlook Add-In using both files. You can use the method you prefer.
The installation files are found on the server path <FireStartInstallDir>\FireStart Resources\ Downloads\FireStart Outlook Add-In.
1. FireStart_Outlook_Add-In_x64.msi/FireStart_Outlook_Add-In_x86.msi
Using this file to install the Outlook Add-In works without any additional configuration.


The Add-In is automatically integrated into Outlook after installation.
2. Prologics.Outlook.Mail.vsto
There are two versions of the vsto file: x64 and x86. The installation may interrupt midway in case the source, FireStart GmbH, is not trusted. In this case, simply install the PROLOGICS IT GmbH.cer (same folder as the installation files) and the installation will carry on.
Configuration of the Outlook Add-In
No further configuration is required if the Add-In will be used just for displaying Tasks. If Workflows should be started with the Add-In, it must be configured with either Outlook or a configuration file:
1. Configuration in Outlook
Two different dialogs can be used. The easier one is found by clicking on the small icon in the FireStart section of the Start tab. Enter the server of the FireStart Client and click Close .


The second dialog is found under Options >Add-Ins> Add-In Options . In the dialog, navigate to the FireStart Outlook Add-In tab and enter the server and click Apply . Click OK to close the dialog.


2. Configuration File
This version might be a bit more functional because you as the administrator don't have to enter the server in every Outlook Add-In you install. With the configuration file, you simply have to copy the file to a specific path and the FireStart server is configured. To get the configuration file you need to configure the Add-In with the method mentioned above at least once. The configuration file then is generated so you don't have to write it yourself. The generated configuration file can be found in path %localappdata%\PROLOGICS\PROLOGICS FireStart Outlook Add-In. Now you just need to copy the file to the same path at every client who wants to install the Outlook Add-In. After that, every user can start a workflow over the Outlook Add-In.
Content of configuration file prologics_firestart_outlook_addin.config:
<?xml version="1.0" encoding="utf-8"?>
<configuration>
<appSettings>
<add key="Server" value="firestart-server.domain.local" />
<add key="Port" value="443" />
<add key="DeleteCompletedTasks" value="True" />
<add key="TaskFolderName" value="FireStart Tasks" />
<add key="FolderGroupName" value="FIRESTART" />
<add key="HideRibbon" value="False" />
</appSettings>
</configuration>
Using the Add-In
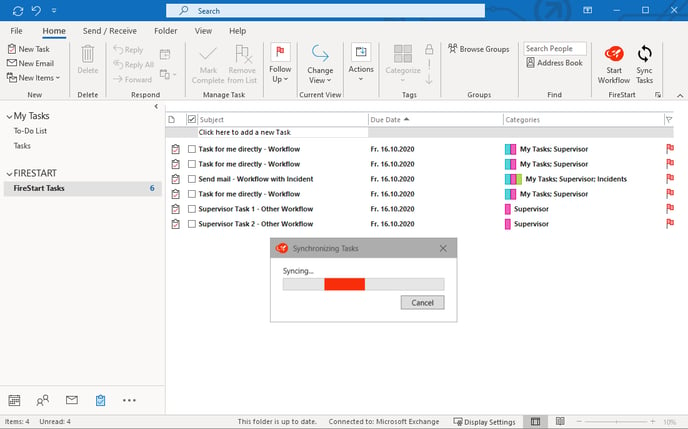
All user assigned tasks (regardless if they were deployed via Mail Portal or not) get shown in the Outlook Task View. When clicking the “FireStart Tasks” folder or the “Sync Tasks” button in the ribbon, the Outlook view get’s synchronized with the FireStart server. Tasks get categories depending on User in Charge (My Tasks), the task as supervisor (Supervisor) or Activity Failed task (Incident).
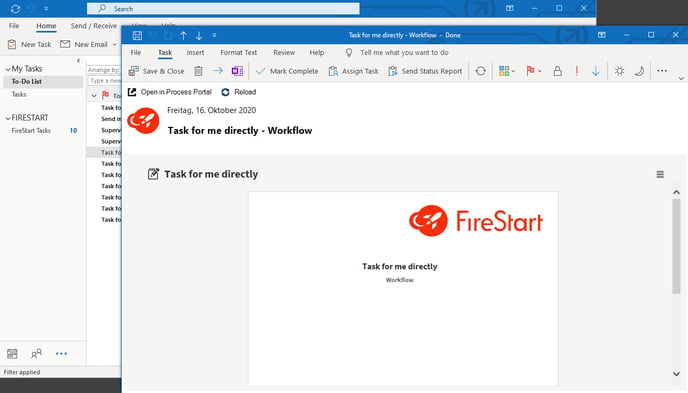
Double-clicking on the task opens it on a separate window:
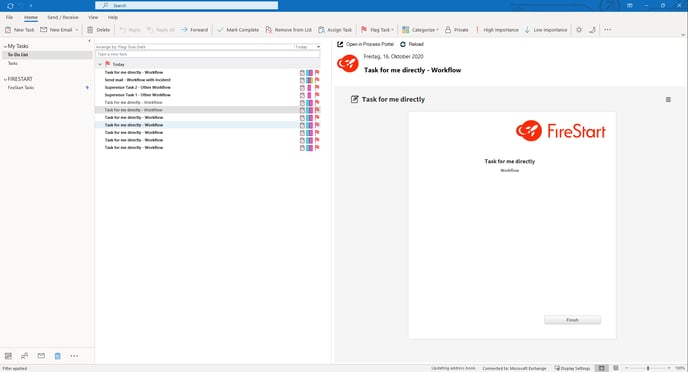
Also, a preview pant on the right side (like in the mail view) can be show:
Note: Due to technical limitations within Outlook, the tab key cannot be used properly to jump between the different input fields in a task.
To learn how to start a workflow, please read the Workflow Automation help articles, and in particular the topic Deploy and Start a Workflow.